Clawdbot for Dummies (30-min setup guide for non-techies)
But I still set up 3 custom Clawdbot agents in under 30 minutes to handle different parts of my business.
I’m not a software engineer.
I can’t code.
I literally failed computer science 1 in college.
But I still set up 3 custom Clawdbot agents in under 30 minutes to handle different parts of my business.
Here’s exactly how I did it step by step (and how you can do it too)
——
The Mental Model
Before you touch anything, it’s helpful to understand how this stuff works.
Think of your AI agent like a company org chart:
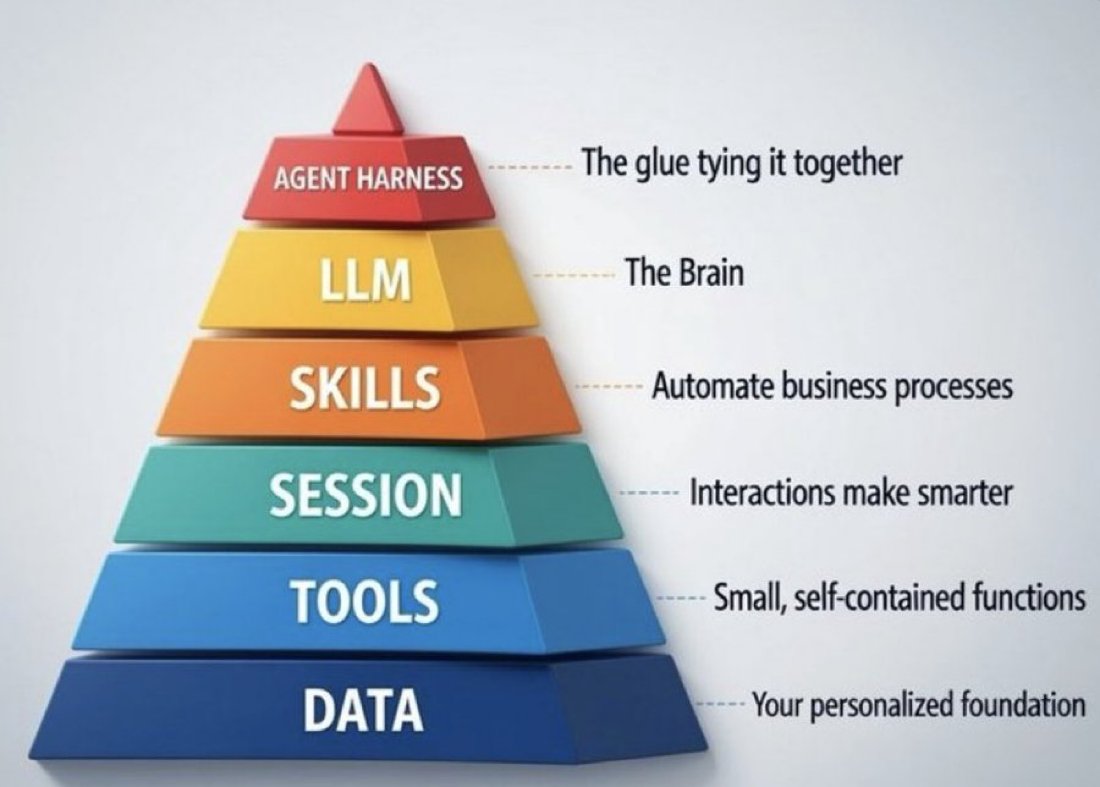
∙ Agent Harness = The structure holding everything together
∙ LLM (large language model) = The brain (Claude, ChatGPT, etc.)
∙ Skills = Your automated SOPs
∙ Sessions = Your interactions with Clawdbot (How it learns over time)
∙ Tools = Specialized capabilities you plug in
∙ Data = Your personalized knowledge base
That’s it. Every agent framework works this way. Learn it once, apply it anywhere.
Before we dive in, I created a free custom GPT that will build you an Agent Blueprint tailored to your business in under 3 minutes. You can grab it here: https://return-my-time.kit.com/4b0927a64c
(the Agent Blueprint + this guide are all you need to build an extremely effective Clawdbot)
——
Step 1: Pick where to host Clawdbot
Head to clawd.bot and run the quick start guide.
Your options:
∙ Mac (we started on a Mac Mini)
∙ Windows with WSL
∙ Ubuntu VPS (my current setup)
Pick one. Move on.
——
Step 2: Run the installation
The quick start guide walks you through everything.
No command-line wizardry.
Just follow the prompts.
——
Step 3: Choose your “brain”
This is where you pick which AI “brain“ powers your agent.
My setup:
∙ Daily driver: MiniMax M2.1 (fast, cheap, handles 90% of tasks)
∙ Heavy lifting: Anthropic Opus 4.5 (for complex analysis and deep work)
Think of it like having a Toyota Camry vs. a Ferrari.
Camrys are cheap and reliable. Ferraris are powerful but expensive.
No difference here.
——
Step 4: Set up your communication channels
Configure where you’ll actually talk to your bot.
Options include Discord, WhatsApp, Telegram, Slack, and Teams.
I prefer Discord for the collaborative environment. I can communicate with my bot and so can the rest of my team, all in one place.
——
Step 5: Add skills (this is where it gets good)
Think of skills as automated SOPs.
Instead of doing the same task 50 times manually, you teach your agent once. Then it handles it the same way every time.
Pre-installed skills worth enabling:
∙ Summarize = (Drop any URL, get the key points)
∙ gog = (Manages your Google Workspace (emails, calendars, docs)
One thing that’s great about Clawdbot is that the community has built hundreds of skills that anyone can download for free.
To access them, all you have to do is install clawdhub.
I’ve armed my Clawdbot with a few custom skills, including:
- Podcast research = (research different podcasts that I could try to guest on)
- Email drafts = (write templated emails in my voice)
- Brand voice = (understand how I write and craft content that sounds like me)
——
Step 6: Add tools and plugins
Tools extend what your agent can do.
Want voice calls? There’s a tool for that.
Need something specific to your workflow? Build it or find it.
This is where I spend most of my time.
I’ve built custom tools at returnmytime.com for running AI Tools Assessments for clients.
Adam (our Tools Assessment Clawdbot) handles these assessments directly.
This is the most powerful part of the system.
——
Step 7: Configure memory (the secret sauce)
When you first install Clawdbot, it’s the dumbest it will ever be.
It has long-term memory, daily memories, and ad-hoc memories before compaction. But after a few sessions, it starts forgetting things.
Don’t panic. This is normal. AI has finite context windows.
But Clawdbot has a cool fix: semantic search.
Think of semantic search as Ctrl + F for your conversation history with Clawdbot.
But instead of ONLY searching for exact keywords, semantic search understands meaning.
You search for an idea, it finds related concepts (even with different words).
Ask it: “When does Corey prefer meetings?”
It doesn’t just search for “Corey” and “meetings.” It understands you’re asking about preferences and scheduling patterns.
Over time, this makes your agent incredibly powerful. It’s building a personalized knowledge base that grows smarter with every conversation.
——
Step 8: Set up backups (important)
We use GitHub.
Each agent has a consistent directory structure. I’ve set up a process that grabs configuration files, redacts sensitive info, and syncs everything back to my repository.
But that won’t save your session files.
Session files contain everything in your long-term memory. That’s your crown jewels. Keep a separate copy. You’ll thank yourself when you migrate systems or transfer knowledge between bots.
——
Step 9: Keep your bot up to date
Run clawdbot update. Or have the bot update itself.
(simply telling Clawdbot “check for updates“ or “update yourself to the latest version” gets the job done)
One rule I follow:
Always backup your data and session files before any update.
Murphy’s Law loves update processes.
——
Troubleshooting:
Here’s what I love about this setup:
Once your agent is configured and connected to an AI brain, you can just talk to it.
Having an issue?
Ask the bot.
Give it access to documentation files and its own codebase.
Let it solve the problem for you.
It’s the same principle as troubleshooting with an human employee.
Ask good questions, get actionable answers.
——
If you’re a non-technical entrepreneur who wants to get started with Clawdbot, this is the path.
And if you haven’t yet:
- Be sure to follow me @GanimCorey as I will be pumping out tons of content about AI/Clawdbot/custom agents for non-technical founders
- Grab my free custom GPT that builds your Agent Blueprint in under 3 minutes. This article + the Blueprint are everything you need to build an effective custom agent.
Grab the blueprint here: https://return-my-time.kit.com/4b0927a64c